자료구조 : heap
느낀점
제일 효율이 좋다는 이진트리만 알아봤는데도 어려웠다. 코드를 아는것도 중요하지만, 이것의 개념을 아는게 더 중요한 것 같다. 예를들어,
- 힙의 특징
- 힙을 사용하는 이유
- 힙을 추가, 삭제 하는 원리
를 이해하면 좋을 것 같다. 자료구조는 내가 사용하는 tool 일뿐, 언제 어디서 사용할지는 내가 정하는 거기 때문. 이제는 실제 코드를 타이핑 해보면서 공부해보자. 다음부터는 실전이다! 알고리즘 이론공부하러가쟝!
힙이란 ?
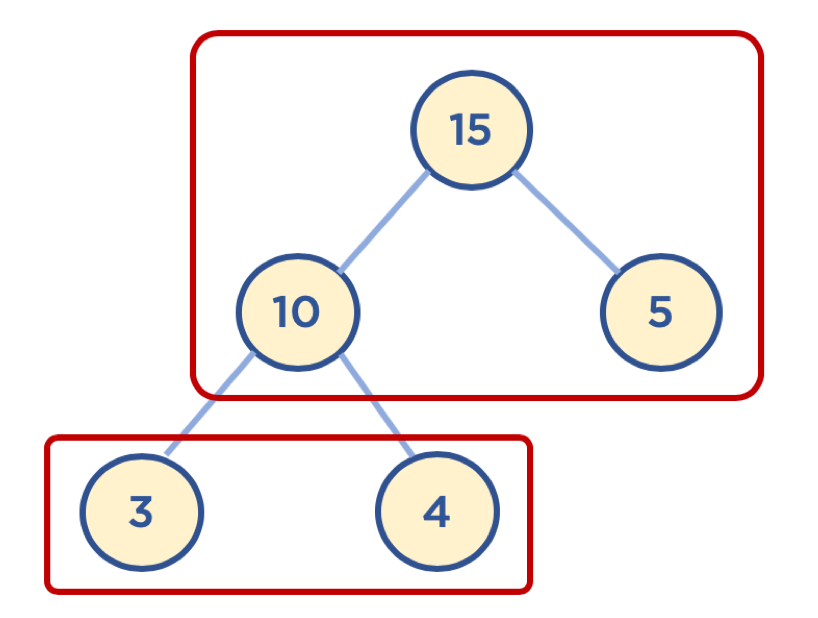
- 힙 : 데이터에서 최대값과 최소값을 빠르게 찾기 위해 고안된 완전 이진트리(Complete Binary Tree)
- 완전 이진트리: 노드를 삽입할 때 최하단 왼쪽 노드부터 차례대로 삽입하는 트리
- 힙을 사용하는이유
- 배열에 데이터를 넣고, 최대값과 최소값을 찾으려면 O(n)이 걸림
- 이에 반해, 힙에 데이터를 넣고 최대값과 최소값을 찾으면 O(logn)이 걸림
- 우선순위 큐와 같이최대값 또는 최소값을 빠르게 찾아야 하는 자료구조 및 알고리즘 구현등에 활용됨
2. 힙 (Heap) 구조
- 힙은 최대값을 구하기 위한 구조( 최대 힙, Max Heap) 와 최소값을 구하기 위한 구조( 최소 힙, Min Heap)로 분류 함.
- 힙은 다음과 같이 두 가지 조건을 가지고 있는 자료구조
- 각 노드의 값은 해당 노드의 자식 노드가 가진 값보다 크거나 같다. ( 최대 힙의 경우)
- 최소 힙의 경우는 각 노드의 값은 해당 노드이 자식노드가 가진 값보다 크거나 작음
- 완전 이진 트리 형태를 가짐
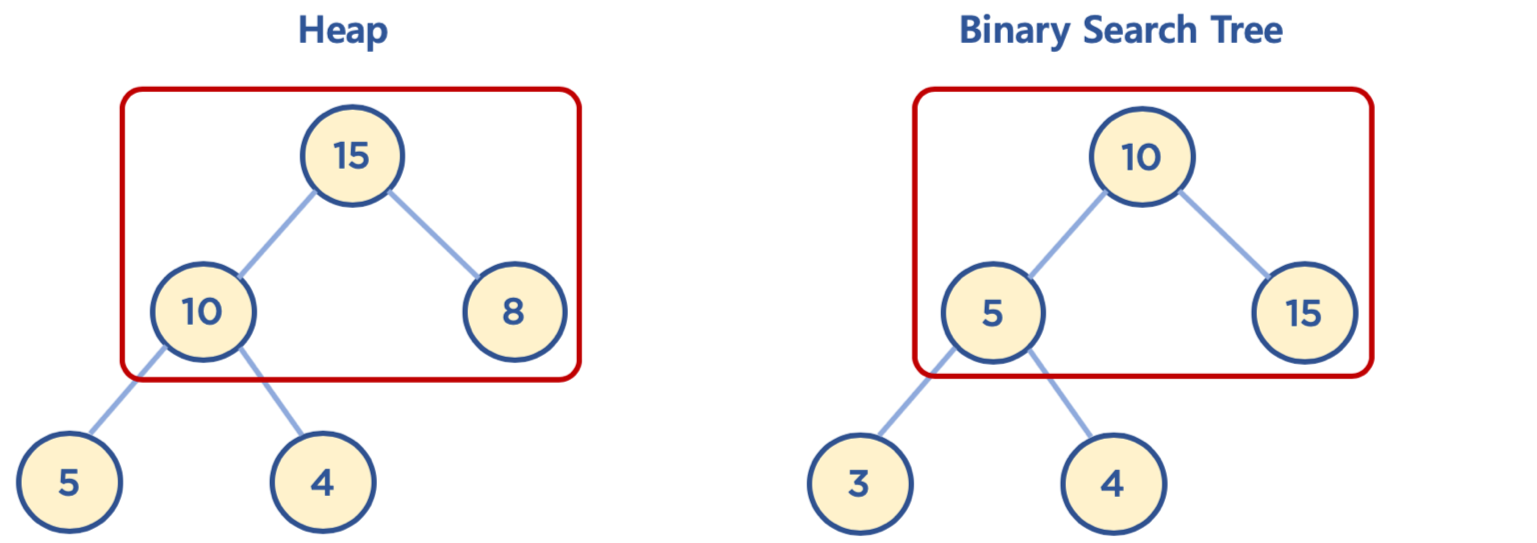
힙과 이진 탐색 트리의 공통점과 차이점
- 공통점 : 힙과 이진 탐색 트리는 모두 이진 트리임
- 차이점 :
- 힙은 각 노드의 값이 자식 노드보다 크거나 같음(Max Heap의 경우)
- 이진 탐색 트리는 왼쪽 자식 노드의 값이 가장 작고, 그 다음 부모 노드, 그다음 오른쪽 자식 노드값이 가장 큼
- 힙은 이진 탐색 트리의 조건인 자식 노드에서 작은 값은 왼쪽, 큰 값은 오른쪽이라는 조건은 없음
- 힙의 왼쪽 및 오른쪽 자식 노드의 값은 오른쪽이 클 수도 있고, 왼쪽이 클 수 도있음
- 이진 탐색 트리는 탐색을 위한 구조, 힙은 최대/최소값 검색을 위한 구조 중 하나.
3. 힙 (Heap) 동작
1
| - 데이터를 힙 구조에삽입, 삭제하는 과정을 그림을 통해 선명하게 이해하기.
|
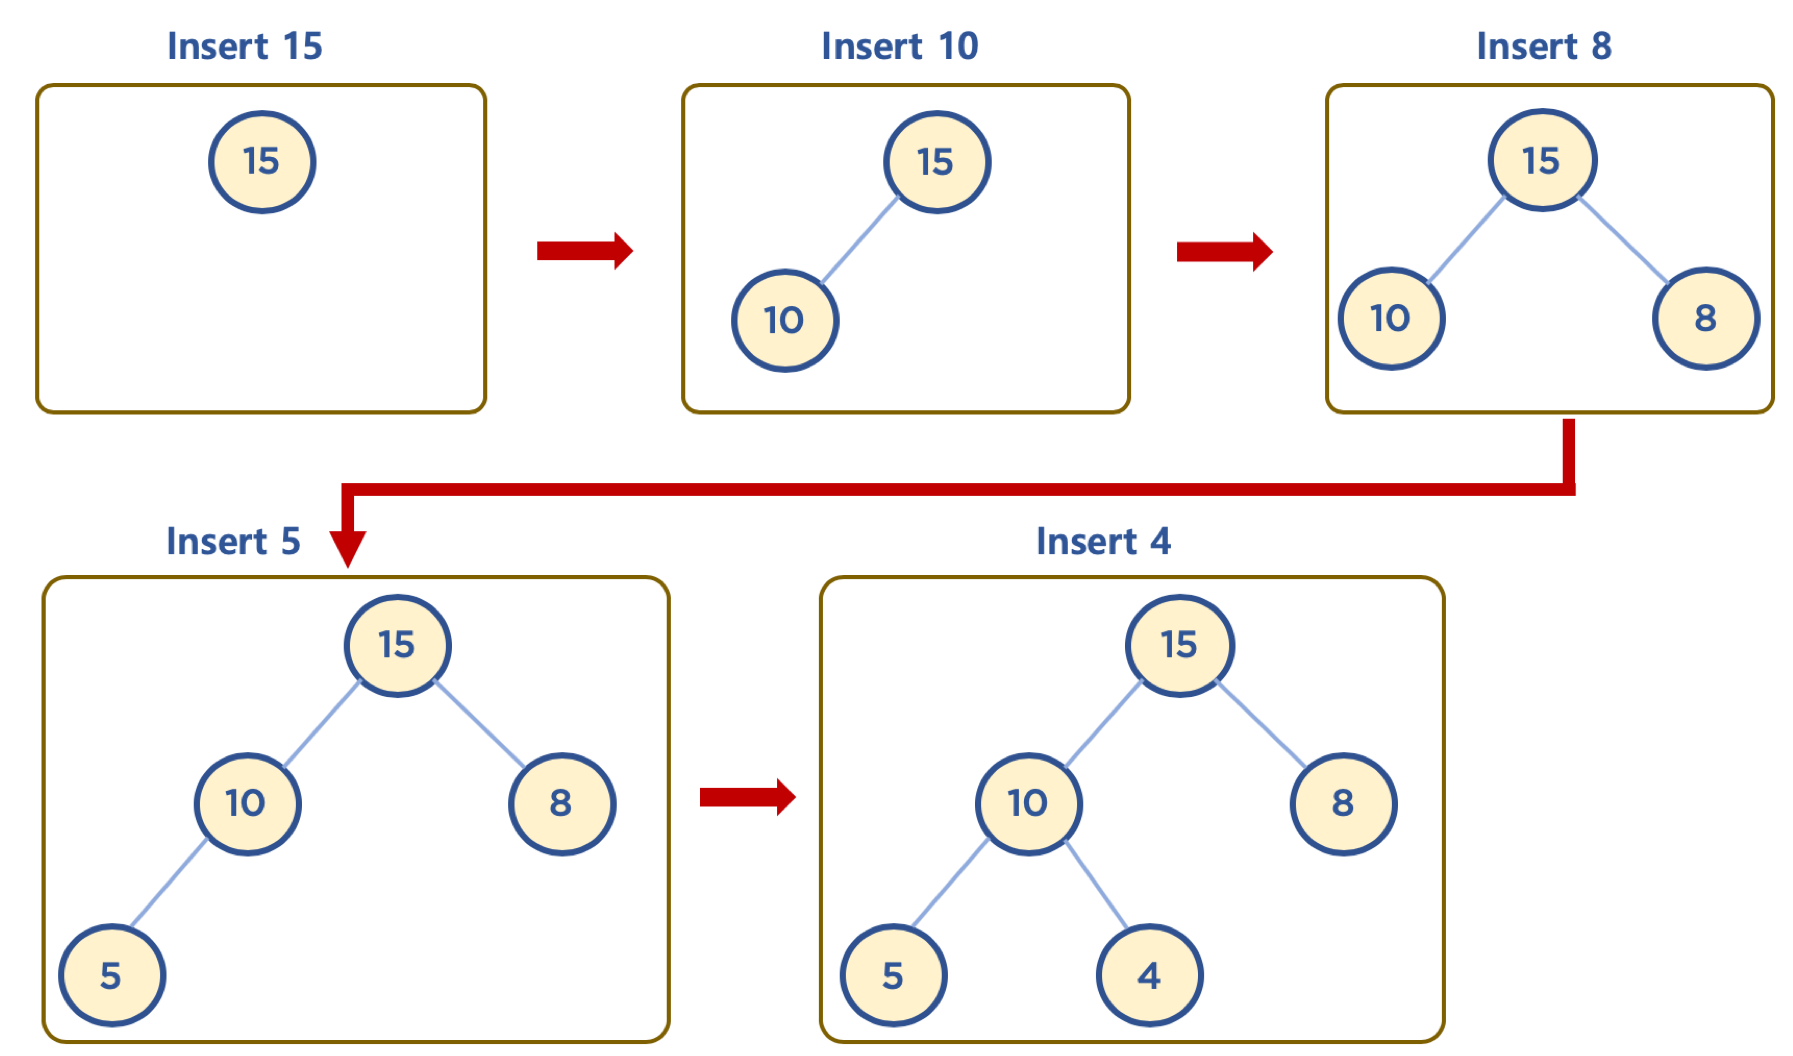
힙에 데이터 삽입하기 - 기본 동작
- 힙은 완전 이진 트리라서, 삽입할 노드는 기본적으로 왼쪽 최하단부 노드부터 채워지는 형태로 삽입
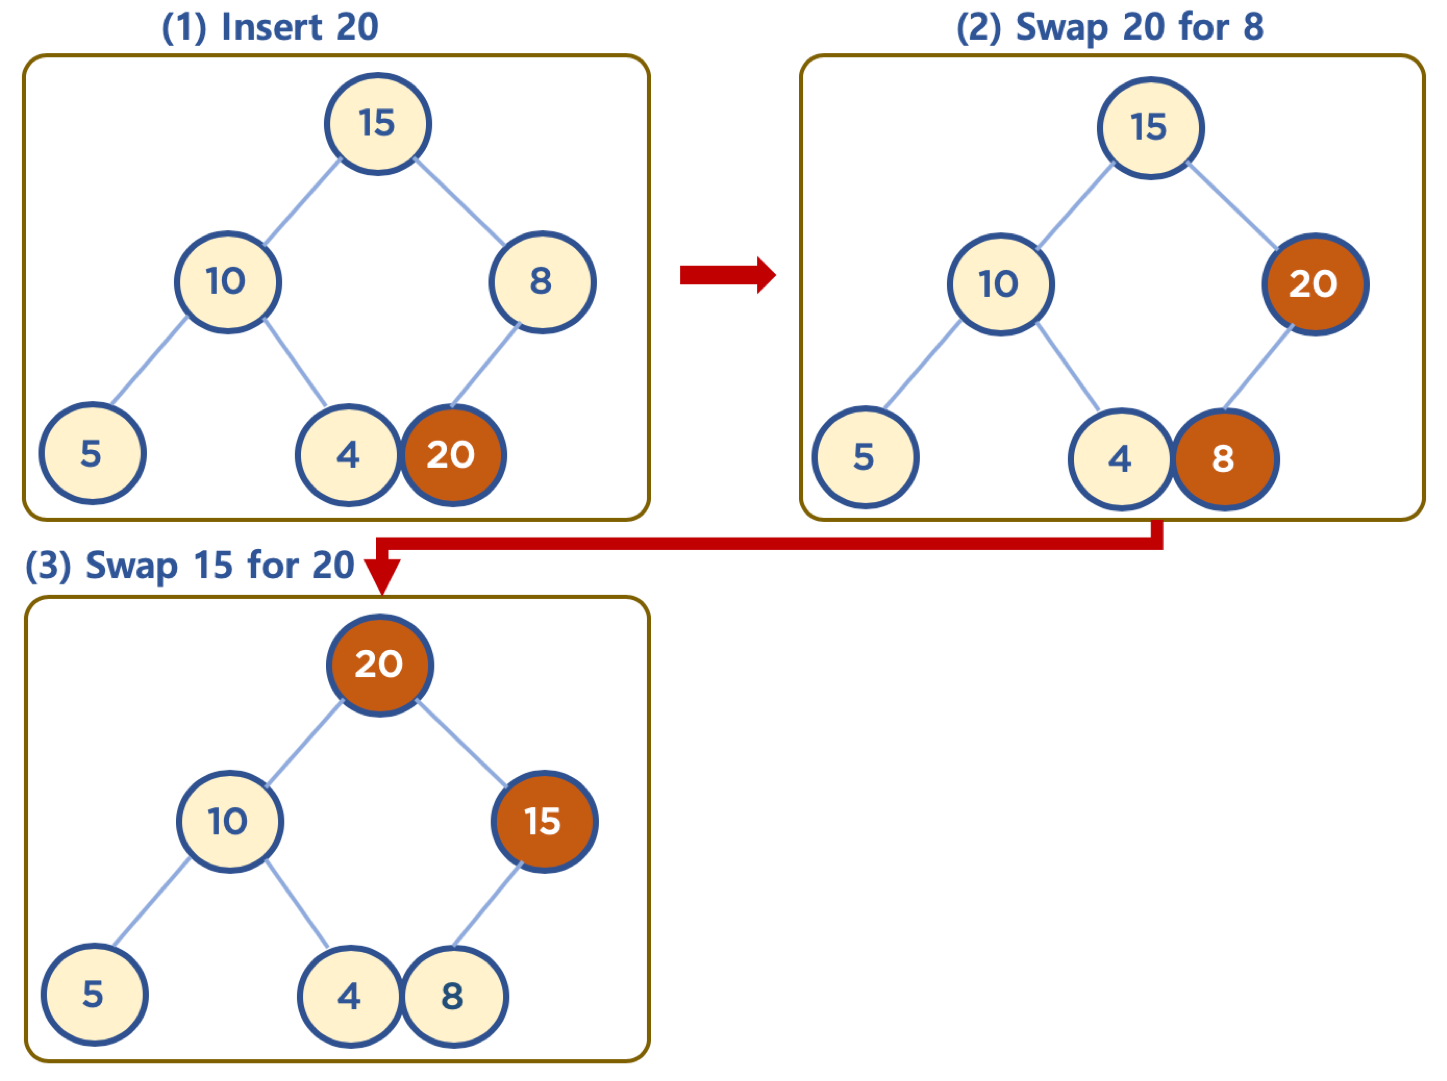
힙에 데이터 삽입하기 - 삽입할 데이터가 힙의 데이터보다 클 경우 (Max Heap 의 예)
- 먼저 삽입된 데이터는 완전 이진 트리 구조에 맞추어, 최하단부 왼쪽 노드부터 채워짐
- 채워진 노드 위치에서 부모 노드보다 값이 클 경우, 부모 노드와 위치를 바꿔주는 작업을 반복함(swap)
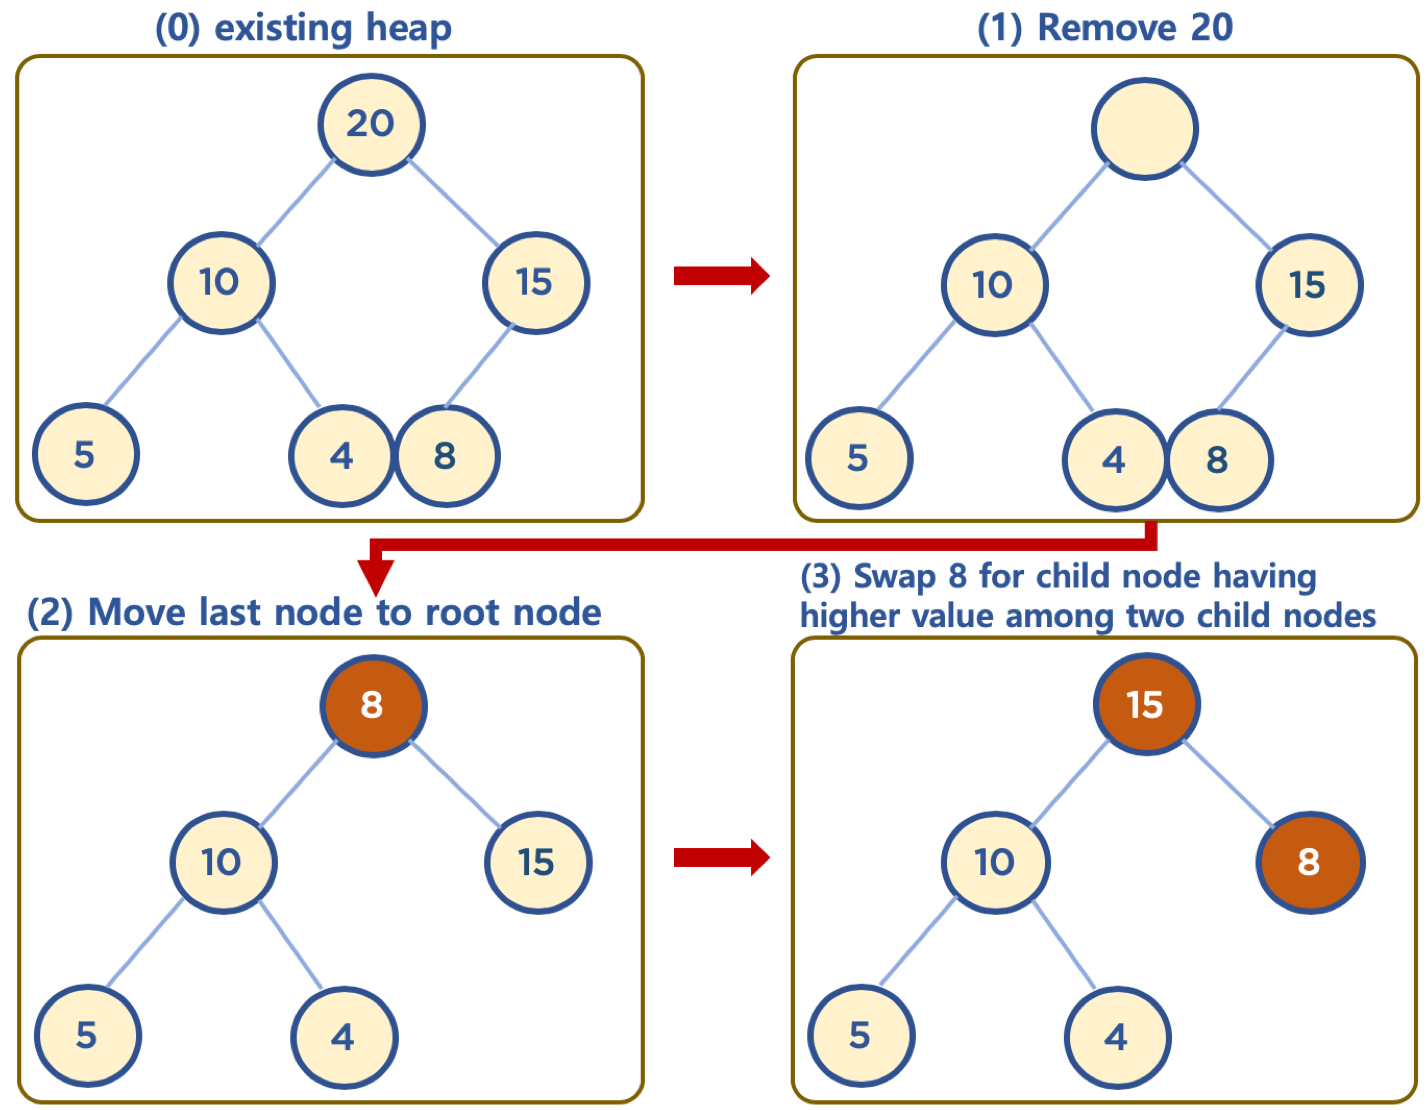
힙의 데이터 삭제하기 (Max Heap 의 예)
- 보통 삭제는 최상단 노드(root 노드)를 삭제하는 것이 일반적임
- 힙의 용도는 최대값 또는 최소값을 root 노드에 놓아서 최대값과 최소값을 바로 꺼내 쓸 수 있도록 하는 것.
- 상단의 데이터 삭제시, 가장 최하단부 왼쪽에 위치한 노드 (일반적으로 가장 마지막에 추가한 노드)를 root 노드로 이동
- root 노드의 값이 child node 보다 작을 경우, root 노드의 child node 중 가장 큰 값을 가진 노드와 root 노드 위치를 바꿔주는 작업을 반복함 (swap)
왜? 마지막 요소를 root 로 끌어올리는 것일까…? 힙이 유효한 힙으로 유지되도록 하기 때문에 수행된다. 루트를 마지막 요소로 바꾸면 힙 속성이 일시적으로 위반되지만, 마지막 요소를 삭제한 다음 새 루트를 “아래로 이동”시키면서 힙 속성이 복원된다. 이러한 프로세스는 “heapifying down”으로 알려져 있다.
4. 힙 구현
힙과 배열
- 일반적으로 힙 구현시 배열 자료구조를 활용함
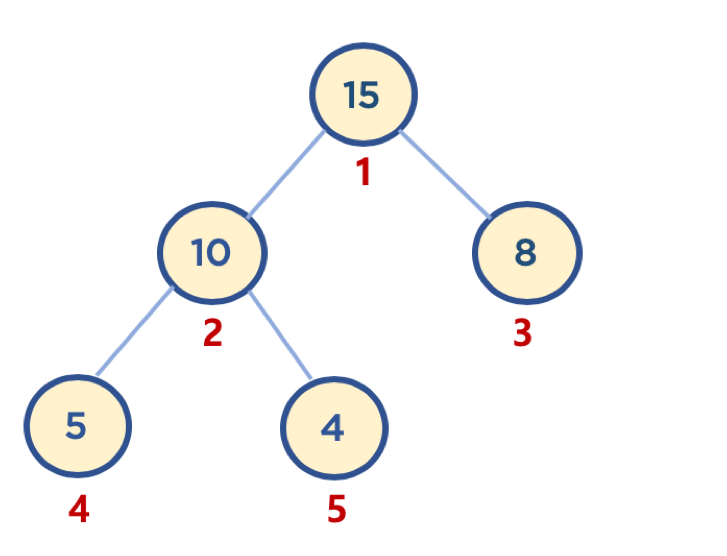
- 배열은 인덱스가 0번부터 시작하지만, 힙 구현의 편의를 위해 root 노드 인덱스 번호를 1로 지정하면 구현이 좀더 수월함. - 인덱스번호를 1로 시작하게 하려면, array 시작 엘리먼트를 None 으로 하는 방법이 있다. - 부모 노드 인덱스 번호 (parent node’s index) = 자식 노드 인덱스 번호 (child node’s index) // 2 - 왼쪽 자식 노드 인덱스 번호 (left child node’s index) = 부모 노드 인덱스 번호(parent node’s index) *2 - 오른쪽 자식 노드 인덱스 번호 (right child node’s index) = 부모 노드 인덱스 번호( parent node’s index) *2 + 1
힙에 데이터 삽입 구현(Max Heap 예)
1
2
3
4
5
6
7
8
9
| class Heap:
def __init__(self, data):
self.heap_array = list()
self.heap_array.append(None)
self.heap_array.append(data)
## 예시
heap = Heap(1)
print(heap.heap_array) = [None, 1]
|
1
2
3
4
5
6
7
8
9
10
11
12
13
14
| class Heap:
def __init__(self , data):
self.heap_array = list()
self.heap_array.append(None)
self.heap_array.append(data)
def insert(self, data):
if len(self.heap_array) == 0:
self.heap_array.append(None)
self.heap_array.append(data)
return True
self.heap_array.append(data)
return True
|
- 힙 클래스 구현3 - insert2
- 삽입한 노드가 부모 노드의 값보다 클 경우, 부모 노드와 삽입한 노드 위치를 바꿈
- 삽입한 노드가 루트노드가 되거나, 부모 노드보다 값이 작거나 같을 경우까지 반복
예를 들어보자.
1
2
3
4
5
6
7
8
| heap = Heap(15)
heap.insert(10)
heap.insert(8)
heap.insert(5)
heap.insert(4)
heap.insert(20)
## [None, 20, 10, 15, 5, 4, 8]
|
코드로 구현해보자.
1
2
3
4
5
6
7
8
9
10
11
12
13
14
15
16
17
18
19
20
21
22
23
24
25
26
27
28
29
30
31
32
33
34
35
36
37
38
39
40
| class Heap:
def __init__(self, data):
self.heap_array = list()
self.heap_array.append(None)
slef.heap_array.append(data)
## 위 그림과 같이 20이 나중에 추가된 경우, 부모노드와 값을 비교하여 올릴지 여부를
## 결정하는 함수
def move_up(self, inserted_idx):
if inserted_idx <= 1:
return False
parent_idx = inserted_idx // 2
## 부모 노드보다 큰경우 true
## 작으면 false 를 반환한다.
if self.heap_array[inserted_idx] > self.heap_array[parent_idx]:
return True
else:
return False
def insert(self, data):
if len(self.heap_array) == 0:
self.heap_array.append(None)
self.heap_array.append(data)
return True
self.heap_array.append(data)
inserted_idx = len(self.heap_array) -1
while self.move_up(inserted_idx):
parent_idx = inserted_idx // 2
## 배열의 원소를 바꾸는 방법이다. python 의 원소 바꾸는 방법.
## 자바스크립트에서는 두가지 방법이 있다.
## 1. temp 를 사용하는 방법
## 2. 구조분해 할당을 사용하는 방법
self.heap_array[inserted_idx], self.heap_array[parent_idx]= self.heap_array[parent_idx], self.heap_array[inserted_idx]
inserted_idx = parent_idx
return True
|
힙에 데이터 삭제 구현(Max Heap 예)
- 힙 클래스 구현4 - delete1
- 보통 삭제는 최상단 노드 (root 노드)를 삭제하는 것이 일반적임
- 힙의 용도는 최대값 또는 최소값을 root 노드에 놓아서 최대값과 최소값을 바로 꺼내 쓸 수 있도록 하는 것
1
2
3
4
5
6
7
8
9
10
11
12
| class Heap:
def __init__(self, data):
self.heap_array = list()
self.heap_array.append(None)
self.heap_array.append(data)
def pop(self):
if len(self.heap_array) <= 1:
return None
returned_data = self.heap_array[1]
return returned_data
|
- 힙 클래스 구현4 - delete2
- 상단의 데이터 삭제시, 가장 최하단부 왼쪽에 위치한 노드 (일반적으로 가장 마지막에 추가한 노드) 를 root 노드로 이동
- root 노드의 값이 child node 보다 작을경우, root 노드의 child node 중 가장 큰 값을 가진 노드와 root 노드 위치를 바꿔주는 작업을 반복함 (swap)
1
2
3
4
5
6
7
8
9
10
11
12
13
14
15
16
17
18
19
20
21
22
23
24
| class Heap:
def __init__(self, data):
self.heap_array = list()
self.heap_array.append(None)
self.heap_array.append(data)
def pop(self):
if len(self.heap_array) <= 1:
return None
returned_data = self.heap_array[1]
return returned_data
## input
heap = Heap(15)
heap.insert(10)
heap.insert(8)
heap.insert(5)
heap.insert(4)
heap.insert(20)
heap.heap_array
## output
[None, 20, 10, 15, 5, 4, 8]
|
1
2
3
4
| heap.pop()
## output
20
|
1
2
3
4
| heap.heap_array
##
[None, 15, 10, 8, 5, 4]
|
실제로 구현해보자.
1
2
3
4
5
6
7
8
9
10
11
12
13
14
15
16
17
18
19
20
21
22
23
24
25
26
27
28
29
30
31
32
33
34
35
36
37
38
39
40
41
42
43
44
45
46
47
48
49
50
51
52
53
54
55
56
57
58
59
60
61
62
63
64
65
66
67
68
69
70
71
72
73
74
75
76
77
78
79
80
81
82
83
84
85
86
87
88
| class Heap:
def __init__(self, data):
self.heap_array = list()
self.heap_array.append(None)
self.heap_array.append(data)
# move_down 은 내려갈지 말지를 정하는 함수
def move_down(self, popped_idx):
left_child_popped_idx = popped_idx * 2
right_child_popped_idx = popped_idx * 2 + 1
# case1: 왼쪽 자식 노드도 없을 때
if left_child_popped_idx >= len(self.heap_array):
return False
# case2: 오른쪽 자식 노드만 없을 때
elif right_child_popped_idx >= len(self.heap_array):
if self.heap_array[popped_idx] < self.heap_array[left_child_popped_idx]:
return True
else:
return False
# case3: 왼쪽, 오른쪽 자식 노드 모두 있을 때
else:
if self.heap_array[left_child_popped_idx] > self.heap_array[right_child_popped_idx] :
if self.heap_array[popped_idx] < self.heap_array[left_child_popped_idx]:
return True
else:
return False
else:
if self.heap_array[popped_idx] < self.heap_array[right_child_popped_idx]:
return True
else:
return False
def pop(self):
if len(self.heap_array) <= 1:
return None
returned_data = self.heap_array[1]
# array[-1]: 배열의 마지막요소이다. array[-n] === array[array.length -n]
self.heap_array[1] = self.heap_array[-1]
del self.heap_array[-1]
popped_idx = 1
while self.move_down(popped_idx):
left_child_popped_idx = popped_idx * 2
right_child_popped_idx = popped_idx * 2 + 1
# casse2: 오른쪽 자식 노드만 없을 때
if right_child_popped_idx >= len(self.heap_array):
if self.heap_array[popped_idx] < self.heap_array[left_child_popped_idx]:
# 배열의 순서를 바꿔주기.
self.heap_array[popped_idx], self.heap_array[left_child_popped_idx] = self.heap_array[left_child_popped_idx], self.heap_arrray[popped_idx]
# case3: 왼쪽, 오른쪽 자식 노드 모두 있을 때
else:
if self.heap_array[left_child_popped_idx] > self.heap_array[right_child_popped_idx]:
if self.heap_array[popped_idx] < self.heap_array[left_child_popped_idx]:
self.heap_array[popped_idx], self.heap_array[left_child_popped_idx] = self.heap_array[left_child_popped_idx], self.heap_array[popped_idx]
popped_idx = left_child_popped_idx
else:
if self.heap_array[popped_idx] < self.heap_array[right_child_popped_idx]:
self.heap_array[popped_idx], self.heap_array[right_child_popped_idx] = self.heap_array[right_child_popped_idx], self.heap_array[popped_idx]
popped_idx = right_child_popped_idx
return returned_data
def move_up(self, inserted_idx):
if inserted_idx <=1:
return False
parent_idx = inserted_idx // 2
if self.heap_array[inserted_idx] > self.heap_array[parent_idx]:
return True
else:
return False
def insert(self, data):
if len(self.heap_array) == 1:
self.heap_array.append(data)
return True
self.heap_array.append(data)
inserted_idx = len(self.heap_array) - 1
while self.move_up(inserted_idx):
parent_idx = inserted_idx // 2
self.heap_array[inserted_idx], self.heap_array[parent_idx] = self.heap_array[parent_idx], self.heapt_array[inserted_idx]
inserted_idx = parent_idx
return True
|
5. 힙(Heap) 시간 복잡도
- depth ( 트리의 높이) 를 h라고 표기한다면
- n개의 노드를 가지는 heap 에 데이터 삽입 또는 삭제시, 최악의 경우 root 노드에서 leaf 노드까지 비교해야 하므로, h = log2n 에 가깝다. 시간복잡도는 O(logn)
- 빅오 표기법에서 logn에서 log 의 밑은 10이 아니라 2이다.
- 한번 실행시마다, 50%의 실행할 수도 있는 명령을제거. 왜냐? 노드의 선택지는 (자식 노드) 2개이므로. 50%의 실행시간을 단축시킬 수 있음
![]()
![]()

